Effortlessly Installing Odoo 16 on Ubuntu 22.04: A Step by Step Guide

Unlock the power of Odoo 16 on Ubuntu 22.04 with ease! Our step-by-step installation guide provides you with all the insights you need to get started on your Odoo journey. Whether you’re a business owner, developer, or simply curious about what Odoo can offer, our comprehensive tutorial ensures a hassle-free installation process. At ITSOdoo, we’re committed to simplifying your experience, but if you ever need additional support or have questions, don’t hesitate to reach out to us. Start your Odoo 16 installation today and discover the endless possibilities it brings to your business.
Odoo, formerly known as OpenERP, is a comprehensive suite of free business software tools accessible to all. Odoo offers a wide array of valuable components to support various aspects of your business operations. These encompass a versatile cash register system, efficient inventory management, streamlined customer relationship management, website creation capabilities, real-time customer communication, e-commerce capabilities, financial transaction handling, precise bookkeeping, meticulous storage organization, and more! Notably, Odoo 16 was released on October 12, 2022, boasting enhanced performance compared to its predecessor, Odoo 15. Let’s explore some of the exciting new features introduced in Odoo 16:
- Opening an invoice is 3.7 times faster.
- There are 2.4 times fewer SQL queries.
- eCommerce pages load 3.9 times faster.
- Reduced the number of HTTP requests, hence the lower latency
The features do not end here. The developers at Odoo are still planning on offering new features in the future. This tutorial will show you how to install Odoo 16 on Ubuntu 22.04.
Table of Contents
Prerequisites
- An Ubuntu 22.04 VPS.
- At least 2GB of RAM.
- SSH root access or a system user with sudo privileges
Step 1. Update The System
First of all, let us log in to our Ubuntu 22.04 VPS through SSH:
ssh master@IP_Address -p Port_numberReplace “master” with a user that has sudo privileges or root if necessary. Additionally, replace “IP_Address” and “Port_Number” with your server’s IP address and SSH port number. Next, let’s make sure that we’re on Ubuntu 22.04. You can verify it with this command:
lsb_release -aYou should get an output like this:
No LSB modules are available.
Distributor ID: Ubuntu
Description: Ubuntu 22.04.1 LTS
Release: 22.04
Codename: jammy
Then, execute this command below to make sure that all installed packages on the server are updated to their latest available versions:
sudo apt updateStep 2. Add System User
We will install an Odoo 16 instance under a system user account. So, we need to create a new system account. This command below is used to create a user called “odoo16”.
sudo useradd -m -d /opt/odoo16 -U -r -s /bin/bash odoo16Step 3. Install Dependencies
Since Odoo is built on Python, we need to install some dependencies to proceed with installing Odoo 16 on our Ubuntu 22.04 system. We can install them by running this command below.
sudo apt install build-essential wget git python3-pip python3-dev python3-venv python3-wheel libfreetype6-dev libxml2-dev libzip-dev libsasl2-dev python3-setuptools libjpeg-dev zlib1g-dev libpq-dev libxslt1-dev libldap2-dev libtiff5-dev libopenjp2-7-devStep 4. Install PostgreSQL
Odoo only supports PostgreSQL to store its data. Let’s execute the command below to install the PostgreSQL server on our Ubuntu 22.04 server.
sudo apt install postgresqlAfter the installation is finished, we can add a new postgresql user for our Odoo 16; run this command. Please note, we need to keep the username in Step 2 and this Step same so that a password is not needed. Else, we need to add user role and password.:
sudo su - postgres -c "createuser -s odoo16"Step 5. Install Wkhtmltopdf
For printing-related purposes, Odoo 16 requires a wkhtmltopdf version higher than 0.12.2. Wkhtmltopdf is an open-source command line tool to render HTML data into PDF format using Qt webkit. To install wkhtmltopdf on your Ubuntu 22.04 server, follow the steps below.
sudo apt install wkhtmltopdfOnce installed, you can check its version by running this command
wkhtmltopdf --versionYou will see an output like this:
wkhtmltopdf 0.12.6Step 6. Install Odoo
In Ubuntu 22.04, we can install Odoo from the default Ubuntu repository, but this will install Odoo version 14. In this article, we will install Odoo 16 under a python virtual environment. We created a system user earlier in this article; let’s switch to system user ‘odoo16’ and then install Odoo under that username.
sudo su - odoo16The command above should bring you to /opt/odoo16 and log you in as user ‘odoo16’. Now, download Odoo from Github.
git clone https://www.github.com/odoo/odoo --depth 1 --branch 16.0 odoo16Execute the following command to create a new python virtual environment.
python3 -m venv odoo16-venvThe virtual environment is now installed; it is time to activate it by running this command.
source odoo16-venv/bin/activateOnce executed, your shell prompt would look like this:
(odoo16-venv) odoo16@ubuntu22:~$Next, let’s install Odoo
pip3 install wheel
pip3 install -r odoo16/requirements.txt
Once Odoo installation is completed, we can create a new directory to store our custom Odoo add-ons.
deactivatemkdir /opt/odoo16/odoo16/custom-addonsNow, exit from user ‘odoo16’ and create the Odoo configuration file.
exit
sudo nano /etc/odoo16.conf
[options]
admin_passwd = ch@ngem3
db_host = False
db_port = False
db_user = odoo16
db_password = False
addons_path = /opt/odoo16/odoo16/addons,/opt/odoo16/odoo16/custom-addons
xmlrpc_port = 8069Make sure to modify the value of the ch@ngem3 key above and use a stronger password. This is your Odoo master password; you need it to create or delete databases.
Step 7. Create Odoo Systemd Unit file
In this step, we will create a systemd unit file. It is required to start/stop/restart Odoo.
sudo nano /etc/systemd/system/odoo16.servicePaste the following content into the systemd unit file above.
[Unit]
Description=Odoo16
Requires=postgresql.service
After=network.target postgresql.service
[Service]
Type=simple
SyslogIdentifier=odoo16
PermissionsStartOnly=true
User=odoo16
Group=odoo16
ExecStart=/opt/odoo16/odoo16-venv/bin/python3 /opt/odoo16/odoo16/odoo-bin -c /etc/odoo16.conf
StandardOutput=journal+console
[Install]
WantedBy=multi-user.target
That’s it. We can now reload systemd and run Odoo.
sudo systemctl daemon-reload
sudo systemctl start odoo16
Check if Odoo is starting by running this command:
sudo systemctl status odoo16Open your web browser and navigate to http://YOUR_SERVER_IP_ADDRESS:8069; you will see the Odoo page.
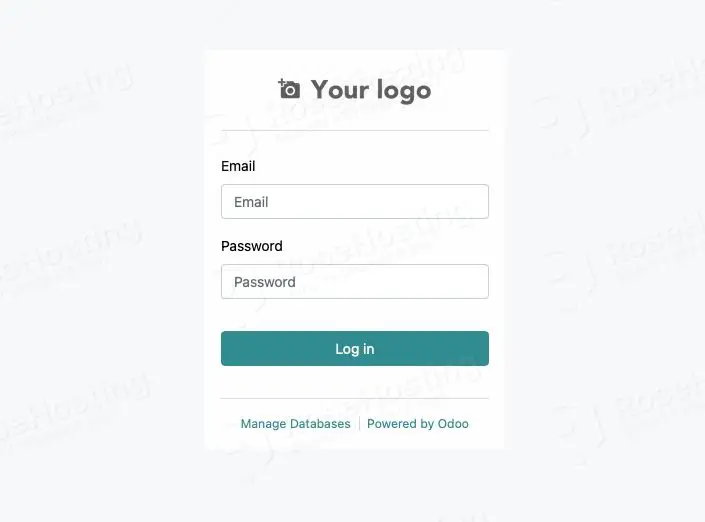
After creating a new database, you will be brought to this page to fill in your email and password, then log in to the backend.
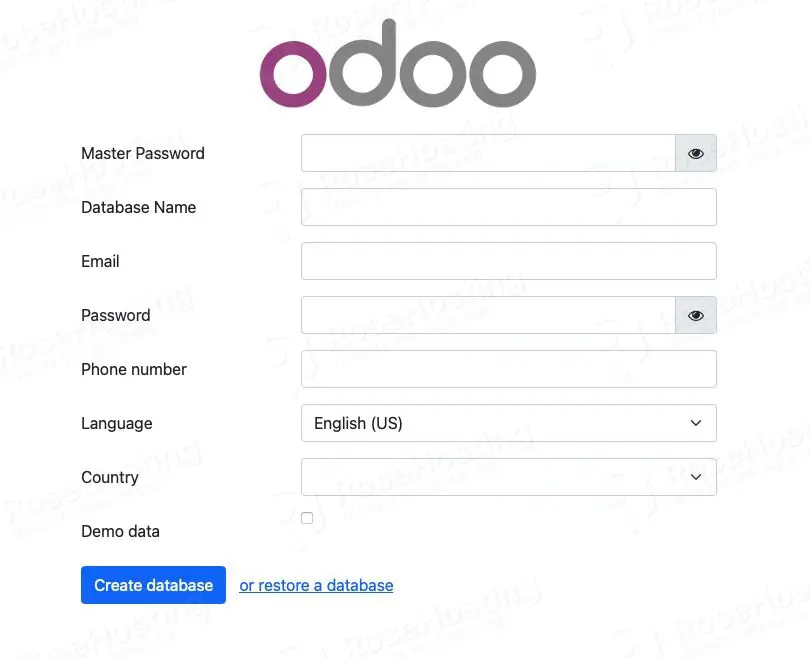
You can create a new database here. Do not forget to remember the email and password; you will need them to access the Odoo backend.
Step 8. Configure Reverse Proxy
To use Odoo with a domain name instead of entering the IP address and port number in your web browser, you’ll need a web server. We’ll set up and utilize Nginx for this purpose in this guide. Follow these steps to install Nginx:
Execute the following command to install it:
sudo apt -y install nginxCreate an Nginx server block for the domain name you will use for accessing Odoo. For example, we will use yourdomain.com
sudo nano /etc/nginx/sites-enabled/yourdomain.comupstream odoo16 {
server 127.0.0.1:8069;
}
upstream odoochat {
server 127.0.0.1:8072;
}
server {
listen 80;
server_name yourdomain.com;
access_log /var/log/nginx/odoo.access.log;
error_log /var/log/nginx/odoo.error.log;
proxy_buffers 16 64k;
proxy_buffer_size 128k;
location / {
proxy_pass http://odoo16;
proxy_next_upstream error timeout invalid_header http_500 http_502 http_503 http_504;
proxy_redirect off;
proxy_set_header Host $host;
proxy_set_header X-Real-IP $remote_addr;
proxy_set_header X-Forwarded-For $proxy_add_x_forwarded_for;
proxy_set_header X-Forwarded-Proto https;
}
location /longpolling {
proxy_pass http://odoochat;
}
location ~* /web/static/ {
proxy_cache_valid 200 60m;
proxy_buffering on;
expires 864000;
proxy_pass http://odoo16;
}
}Save the file and restart the web server for the changes to take effect
sudo systemctl restart nginxYou can now begin your project by accessing Odoo through your domain name at http://yourdomain.com. Happy working!
At the conclusion of the Odoo installation guide, we want to remind you that if you encounter any challenges or would prefer assistance with the installation process, please don’t hesitate to contact us. Our dedicated support team is here to help ensure your Odoo installation goes smoothly. Feel free to reach out to us for any guidance or assistance you may require during this process.


